Air gun
July 8, 2012
Idea
This project interested me simply because I wanted something with destructive potential. Originally, I intended to use water pressure (from a garden hose) to pressurize air in a PVC pipe with a ball valve connected to it, and then use the pressurized air to propel a projectile - this setup would allow effortless pressurization but would require to be in the proximity of a water hose. I was able to confirm that this does work (this is one of the reasons for the pressure vessel being so large since in the original design water would fill up most of it). However I decided to instead use a completely air-based system where the pressure would be created by use of a bicycle tire pump, since that makes the air gun more portable and gives greater control over pressure. Also the tire pump connector is standardized and would allow the use of different pressurization mechanisms (such as an electric pump).
Safety
This project uses high pressure air and depending on the design and pressurization could cause harm. Be sure that all parts used are rated higher than nominal air pressures to be used (I never exceed 100 PSI with my design) and use properly rated PVC cement for connecting all the parts to prevent them from exploding when the device is pressurized (this will necessarily happen if the parts are not properly connected!).
Supplies
Note: PVC means "PVC Schedule 40", which includes all parts except for the 0.25 inch barrel. Note that CPVC components of similar inner diameter usually have a much lower pressure rating and should be used with caution.
- 2 ft of 0.5 inch PVC pipe for the barrel, rated 600 PSI
- Female adapter for 0.5 inch barrel*
- 2+ ft of 0.25 inch CPVC pipe for small barrel (I could not find PVC of this size)*
- Female adapter for 0.25 inch barrel*
- Small length (9 inches) of 0.5 inch PVC pipe for connection to valve and to male adapter
- 2 ft of 1.25 inch PVC pipe for the pressure vessel (same as length of barrel), rated 370 PSI
- 1.25 inch slip cap for pressure vessel
- 1.25 inch coupling for pressure vessel
- 1.25 inch to 0.5 inch reducer bushing to connect pressure vessel to valve
- 0.5 inch PVC ball valve, rated 150 PSI
- 0.5 inch male adapter to connect to valve*
- PVC cement to keep all the parts attached
- Old bicycle inner tube for the Schrader valve pump connection
- Circular magnet with inner diameter adequate to fit around barrel (optional)
*= If you want to switch between multiple barrels
Construction
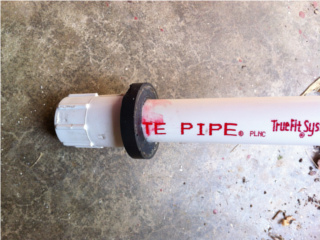
The pressure vessel will be connected to the bit from the bicycle tire to allow connection to a tire pump. Drill a hole through the center of the 1.25 inch end cap that very closely matches the size of the pump connector, and cut out a piece of the bike inner tube that is roughly 1.25 inches in diameter and contains the Schrader valve in the center. The rubber material surrounding the valve should be thicker than the rest of the inner tube and cutting out just this circle of thicker rubber ended up fitting very well inside the 1.25 inch end cap. I used PVC cement to attach the rubber disk to the inside of the end cap and then super glued the edges of the rubber disk to the end cap from inside and super glued the edges of the valve to the outside of the end cap so the valve would not 'peel off' from the inside and allow air to escape. Leave plenty of time for all the cement/glue to set properly because of the connection between different materials. Next attach and cement the end cap to the 1.25 inch pipe vessel.
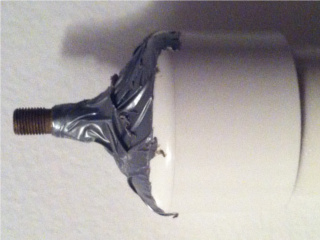
The 1.25 inch end cap cemented to the 1.25 inch pipe that will serve as a pressure vessel. The Schrader valve from the bicycle inner tube is cemented on the inside of the end cap and allows connection to a bicycle pump for pressurization of the vessel. The duct tape is for decoration purposes.
I used the same length of pipe for the vessel as the length of the barrel, because that would allow for a continued high pressure as the projectile is leaving the barrel. A much smaller pressure vessel would definitely work and may be necessary for a more portable unit, but it will not work as well with heavy projectiles. With a smaller pressure vessel, the propelling pressure when the projectile leaves the barrel will be smaller than that with a large vessel, so a small projectile (or one that does not fit the barrel closely) may start slowing down even while it is in the barrel. This effect is not large but I thought it would be better to overestimate.
Next attach the coupling and reducer bushing to the large pressure vessel pipe. After that, a short (about 2 inches) piece of 0.5 inch pipe connects the bushing to the ball valve, which is the 'trigger'.

The 1.25 inch pressure vessel pipe on the left is connected to a 1.25 inch coupling and reducer bushing, ending with a short 0.5 inch pipe on the right. The ball valve is attached further on the right (not visible here) to this 0.5 inch pipe.
Then another short piece connects the switch to the male adapter which allows attaching multiple barrels (with a female adapter) to the pressure vessel. If you only use one barrel, the valve should connect directly to it. Make sure all the pieces are properly cemented and let set for 24 hours in a ventilated environment.
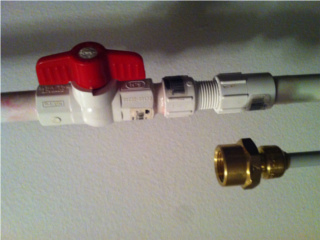
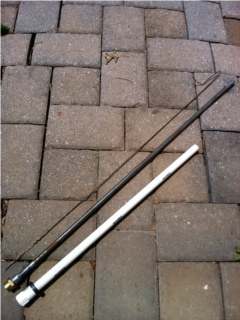
Following the pressure vessel on the left (not visible), the 0.5 inch pipe connects to the ball valve and then to a male adapter. Two barrels that can connect to this adapter are shown, 0.5 inch is already connected and 0.25 inch is shown below. Having multiple barrels allows launching of different sized projectiles and possibly experimenting with barrel lengths.
Afterwards, I duct-taped the all the pieces together for extra safety in case the cement failed - the duct tape is not what's holding them together though. Finally, I tested the pressure vessel, checking for air leaks at pressures up to 100 PSI, using a bicycle tire pump with a built-in pressure gauge. The weakest component in the entire assembly is the connector from the bicycle tire, since it is not rated above ~60 PSI, however it was able to withstand 100 PSI. The close fit of the hole in the 1.25 inch end cap helps increase the pressure capacity here by reducing stress on the inner tube rubber material. The next weakest component is the ball valve, rated for 150 PSI.
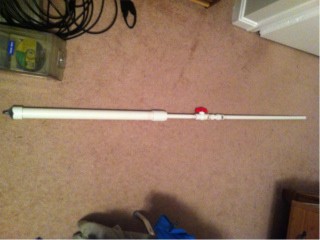
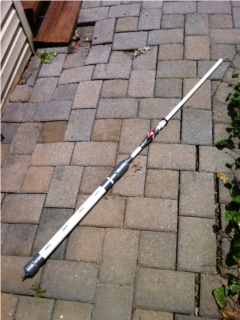
The completed air gun (before duct tape is applied) with the 0.5 inch barrel attached. The total length is 5 feet.
After some testing I found that it was difficult to fire the projectiles downwards because unless they had a very close fit with the barrel they would simply roll out when the gun is pointed downwards. To overcome this difficulty with metal projectiles, I took out a circular magnet from a small speaker, and the magnet happened to exactly fit over the 0.5 inch barrel. This magnet holds metal projectiles close to the ball valve and prevents them from rolling out of the barrel due to gravity. Superglue around all the edges holds the magnet in place quite well.
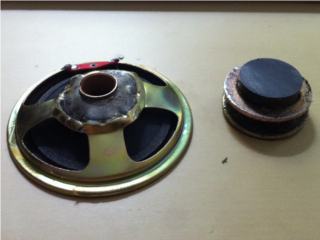
On left, the speaker from which the round magnet was taken (it was between the two metal plates below the disk magnet that is to the right of the speaker). On right, the magnet is attached to the 0.5 inch barrel next to the female adapter.
The air gun is now ready for testing!
The completed air gun with duct tape and holding magnet on the 0.5 inch barrel is shown on the left. A closer view of the barrels is on the right, along with an unbent clothes hanger that is used to load projectiles to the proper depth inside the 0.25 inch barrel (projectiles here need to have a tight fit and thus have to be pushed into the barrel).
Testing
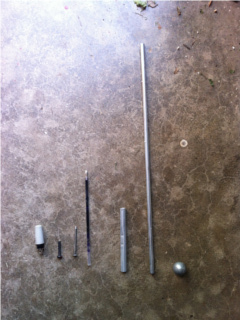
The various projectiles used with the air gun, the smaller ones with the 0.25 barrel and larger ones with the 0.5 barrel.
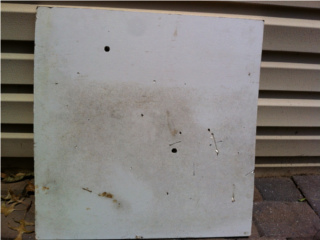
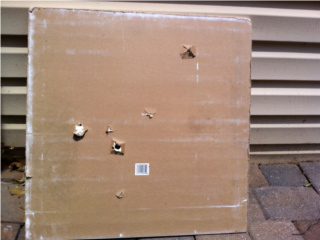
The front and back of the 0.5-inch thick drywall after it was fired at using the projectiles. Only the 0.5 inch ball (on the right of projectiles image above) and the 0.25 inch diameter rod next to it penetrated the drywall.
First I wanted to test the efficiency of different projectiles at penetrating a 0.5 inch thick piece of drywall. All of the projectiles were fired from a distance of 22 ft (6.7 m) and using air pressure from 20 to 80 PSI. First trying small projectiles with the 0.25 inch barrel, I found that projectiles like an average nail very strongly tend to turn and hit the drywall with the whole length of the nail rather than with its point. This occurred regardless of launch pressure and prevented any of the nails from penetrating the drywall although I am sure they could have if they were to hit it head on. This is visible in the drywall as long but shallow indentations. To overcome this problem I used a very long metal rod exactly 0.25 inches in diameter so it fit snugly in the barrel (it is next to the 0.5 inch ball the right on the image above). The difference the oversized pressure vessel makes would be most evident with this large and massive projectile. This rod appeared to travel through the air relatively slowly after exiting the barrel but had no problem penetrating the drywall. To make sure this is consistent I shot the rod four times (it went through each time) and four of the smaller penetrations on the back of the drywall are from this test.
Next, I tested the 0.5 inch barrel. It turned out to be quite difficult to find a good projectile that would fit snugly in a 0.5 inch barrel; mostly pens and markers met the criteria but they lacked the necessary strength. Miscellaneous plastic projectiles such as the marker shown below (the pieces of it that I could find) did not do much of anything to the drywall so I fired them at a heavy steel cube instead.
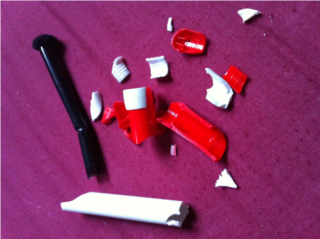
The pieces left over after a 0.5 inch diameter marker was shot at a steel surface.
After much searching, I found 0.5-inch diameter metal spheres that would be the perfect projectile for the 0.5 inch barrel (it can be seen on the right of the projectiles image). At this point I added the circular magnet to the barrel to hold the spheres in place for more flexibility in shooting. The sphere went through the drywall with absolutely no difficulty even under 50 PSI and had plenty of energy remaining afterwards (I was not able to find enough unneeded material to fully test the penetrating power of the sphere). Two of the penetrations in the drywall are from the spheres. Next I wanted to compare the power of the air gun with a pretty good BB gun that used metal BBs. For this I used an old pumice stone and fired the weapons as contact shot (barrel touching the stone).
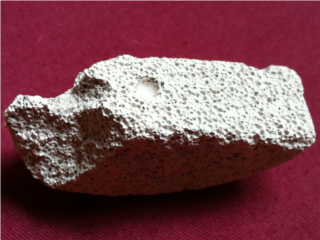
The pumice stone after being fired at with barrel touching the stone, using a BB gun (middle indentation) and the air gun 0.25 inch barrel (left indentation).
The indentation from the BB gun is barely visible above while the air gun (0.25 inch barrel) with a BB-sized projectile broke off a whole chunk of the pumice stone. The air gun is clearly more powerful. Finally, I thought I might as well destroy the now broken stone with the 0.5 inch ball shot. I fired it and, lo and behold, no effect whatsoever. It turns out the forward air pressure created by the ball accelerating inside the barrel was enough to force the pumice stone out of the way of the ball (since the stone was touching the end of the barrel) so the stone survived. Finally, I wondered whether the 0.5 inch sphere could go through a thin metal plate (fired at 22 ft).
The sphere easily went through the aluminum plate at 60 PSI, although at 20 PSI it only had enough energy to dent the metal surface.
Overall, I am satisfied with the destructive potential of the air gun. Still not quite sure what to do with it now that I've run out of old stuff to shoot at. It takes some practice to aim it properly since there is no handle and no traditional "trigger". The gun does take a long time to reload and would not be suitable in any sort of use other than for the fun of it (like a potato cannon).